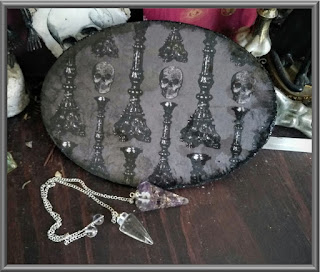
A pendulum and answer board is probably the most simple of the divination and spirit communication methods available today. A pendulum is just a crystal or other pointed object suspended from a string or chain used to get answers by swinging over an answer board. An answer board can be made with a piece of cardboard or paper or a fancy little board like the one we are making today and have some of the "answer" options to the questions you want to ask. The options can be anything you want from Yes or No to colors, numbers, dates, names, etc. We even carry decorated boards in the shop that have blank spaces you can write any answer options you want so you can customize your pendulum sessions as needed. And they add a bit of class to your professional readings.
Pendulums are believed to work by accessing the collective unconscious, spirit realm, or your own subconscious depending on your beliefs. Personally, I believe it's the collective, or Akashic records, we are accessing when using pendulums. Unless you specifically request to speak to a spirit directly. Either way if you are getting the answers you need that is all that matters. Before using your pendulum you must calibrate it. To do this begin by establishing the direction you want for each answer option like 'yes' or 'no'. Next ask questions you know to be true and be sure it responds correctly each time. Next ask questions you know are false and do the same. Once you are satisfied with how it is working you can begin using it for magick and divination.
So, how do you make a pendulum and answer board? Let's get started!
ANSWER BOARD
Materials needed:
A wooden board (you can get one at Michael's or cut your own)
Sandpaper
A pencil
A piece of tracing paper
A print out of the board design you want
Paint
Paintbrushes
Spray Sealer
Newspaper to cover your work surface
The first thing we want to do is sand our board clean and smooth.
Next you want to paint the board your background color and then draw the picture and choices on the board. If drawing isn’t your jam then you can print the picture and trace it from the back of the paper so it will be front ways when you apply it. Trace it with a pencil and be careful not to blow the dust away or put your hand in it. Print your image backwards and trace with a pencil. Then flip the paper and place on the board and trace again leaving the image on the board.
Don’t forget to paint the edges of your board! Now you can paint the details, and then clean up any smears you may have from the pencil. Spray a few coats of sealer on the board to protect your work and it is ready for use!
PENDULUM
You will need:
A crystal with a definite point
A 6 ½” chain or rope
2 - 10” wires to wrap your crystal
3” wrap wire
A bead of your choosing
Flat nose pliers
Round Nose Pliers
Wire Cutters
The first thing we want to do is to wrap our crystal so it can be hung from a chain. Take your 2 wires and bed them into an L shape in the center. Hold them so that they face each other and make a small square in the center.
Place the bottom of the crystal through the square and twist the ends with your pliers 6 times. Then fold the twisted wire flat against the stone towards the top and start twisting the new sides together.
Bring the sides to the top of the crystal, hold together, and bend the wire back with the round nose pliers into a bail. Take your wrap wire and wrap it around the bail. Cut off the excess wires and flatten.
Cut a 2” – 3” length of wire and run through the bead. Use your flat nose pliers to hold the wire and the bead. While using the round nose pliers make a small loop and wrap the excess around the loop to hold it in place. Do the same with the other end but slip it through the chain before closing it off. This bead at the end will help you to hold onto the pendulum when using it. Use a jump ring (or make one with wire) to hold the pendulum to the chain, and you are done!
Your pendulum can be any design that fits you and makes you happy. It can be a dedicated design like the one we just made or a blank design to be customized as you see fit like the one below. I hope you enjoyed our craft for today! Click HERE to pick out a beautiful pendulum and board from the shop to go with the board you made! Variety is always a good thing!
HAPPY WITCHING!!


No comments:
Post a Comment